Stabilize in After Effects with Warp stabilizer or Motion Tracker

The best way to keep your shots stable is to use a tripod.
But for those situations when you don’t have a tripod handy, or it’s impossible to use one, you can stabilize the image afterwards within After Effects.
Here are two methods for smoothing out troubled shots.
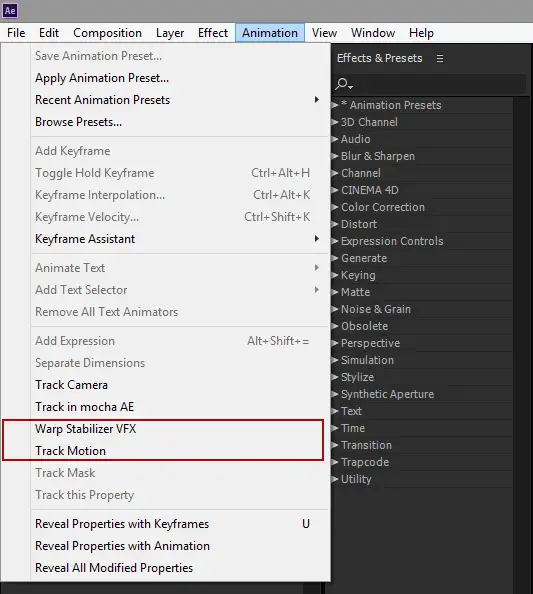
The Warp Stabilizer
The warp stabilizer for After Effects can stabilize a choppy image without too much effort. The calculation takes place in the background so that you can continue working while stabilizing.
After the image analysis you will see a large number of markers, which are the reference points that are used to stabilize.
If there are moving parts in the image that disturb the process, such as swaying branches of trees or people shopping, you can exclude them, either manually or as a mask selection.
You can then choose whether these markers should not be followed the entire clip, or only on a specific frame.
The markers are not visible by default and you have to activate them via the settings.
The Warp Stabilizer is an excellent plugin with which you can often achieve good results without too much work.
Motion Tracker
After Effects has a motion tracker function as standard. This tracker works with a reference point in the image.
For best results, choose an object that contrasts with its surroundings, such as a gray stone in a green lawn. You indicate the center and the nearby environment to analyze.
Getting started with your own stop motion storyboards
Subscribe to our newsletter and get your free download with three storyboards. Get started with bringing your stories alive!
We'll only use your email address for our newsletter and respect your privacy
That area should be as large as the maximum shift per frame. Then the tracker will follow the object, you will have to adjust the tracking at several points in the timeline.
If everything is correct, you can perform the calculation on the clip.
The result is actually the opposite of the previous image, the object is now stationary and the entire clip shakes within the frame. By zooming in on the image a bit, you have a nice tight image.
If you know that you have to stabilize afterwards using software, then zoom out a little further during the recordings, or stand at a greater distance from the subject, because you will lose some image at the edges.
In addition, it is important that you stabilize per clip, not on the final assembly. Filming at higher frame rates gives the best results.
Ultimately, software stabilization is a tool but not a panacea, take your tripod with you or use a gimbal (top choices here). (By the way, when using a gimbal, post-production stabilization may still be necessary)

Hi, I'm Kim, a mom and a stop-motion enthusiast with a background in media creation and web development. I've got a huge passion for drawing and animation, and now I'm diving headfirst into the stop-motion world. With my blog, I'm sharing my learnings with you guys.
